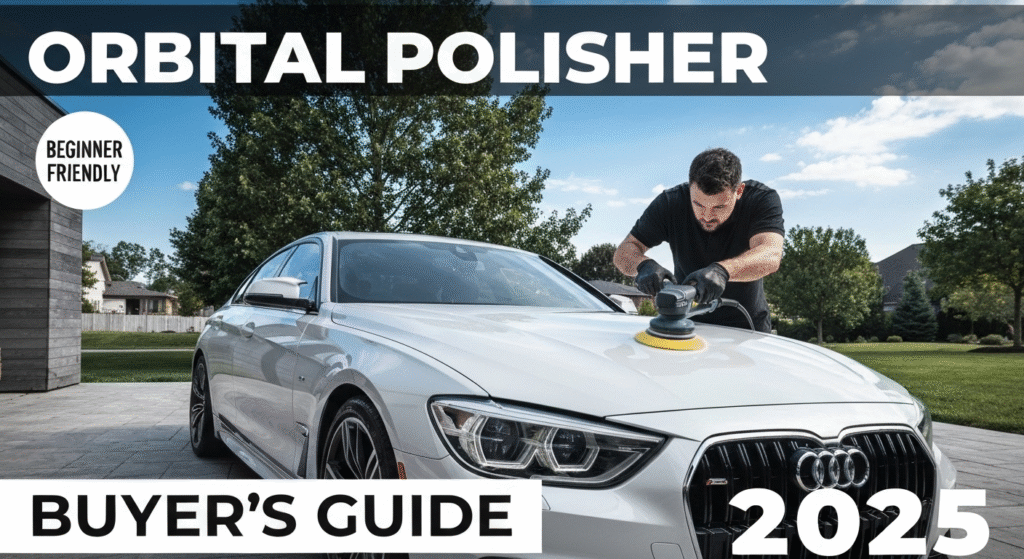
Finding the right orbital polisher can make the difference between professional-looking results and a frustrating experience that damages your car’s paint. After five years of hands-on experience with automotive detailing equipment, I’ve tested dozens of polishers across every price range and skill level.
My name is Sharmin, and I’ve been a professional automotive detailing expert for over five years. During this time, I’ve worked with everything from budget-friendly dual-action polishers to high-end rotary machines. I’ve helped hundreds of car enthusiasts choose their first polisher and watched them transform from nervous beginners to confident detailers. This guide combines real-world testing, client feedback, and professional insights to help you make the best choice for your needs and budget.
What Is an Orbital Polisher and Why You Need One
An orbital polisher is a power tool designed to apply polish, compound, and wax to your car’s surface in a controlled, circular motion. Unlike hand application, orbital polishers deliver consistent pressure and movement patterns that create professional-grade results.
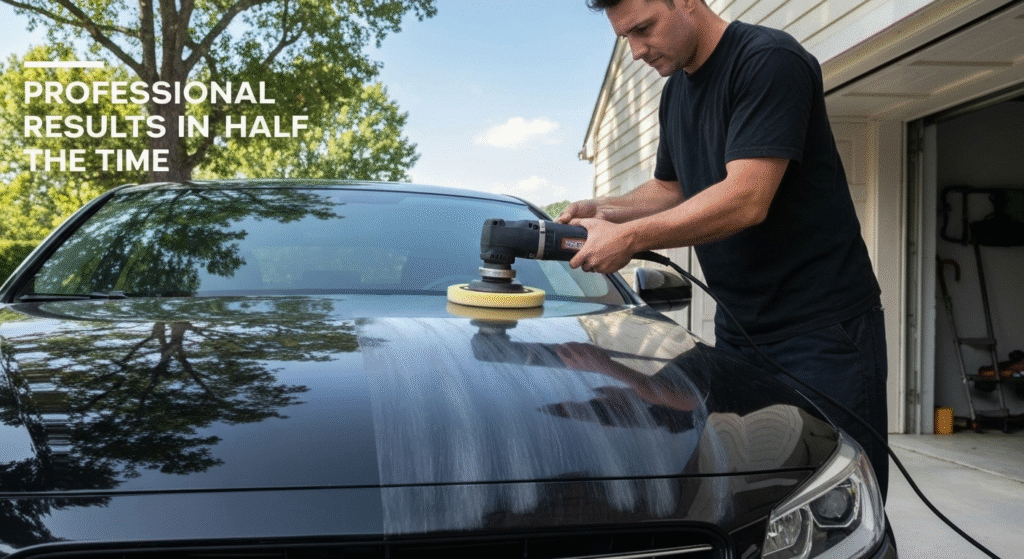
The main benefit lies in efficiency and safety. Hand polishing a full-size sedan takes 6-8 hours of exhausting work. An orbital polisher cuts this time to 2-3 hours while delivering superior results. More importantly, these machines reduce the risk of paint damage that comes from uneven pressure or improper technique.
I remember my first client who attempted to remove swirl marks by hand. After four hours of work, his BMW’s hood looked worse than when he started. We used a dual-action polisher to fix the damage in 30 minutes. The transformation was remarkable – what had been cloudy, scratched paint became mirror-smooth and glossy.
Types of Orbital Motion
Orbital polishers create two distinct movement patterns. Understanding these differences helps you choose the right tool for your skill level and project needs.
Dual-Action (Random Orbital): The pad spins while simultaneously orbiting in a larger circle. This creates a random pattern that prevents heat buildup and reduces swirl marks. These machines are forgiving and perfect for beginners.
Forced Rotation: The pad spins in a fixed circular pattern with more aggressive cutting power. These tools remove defects faster but require more skill to avoid damage.
Dual-Action vs Rotary Polishers: Making the Right Choice
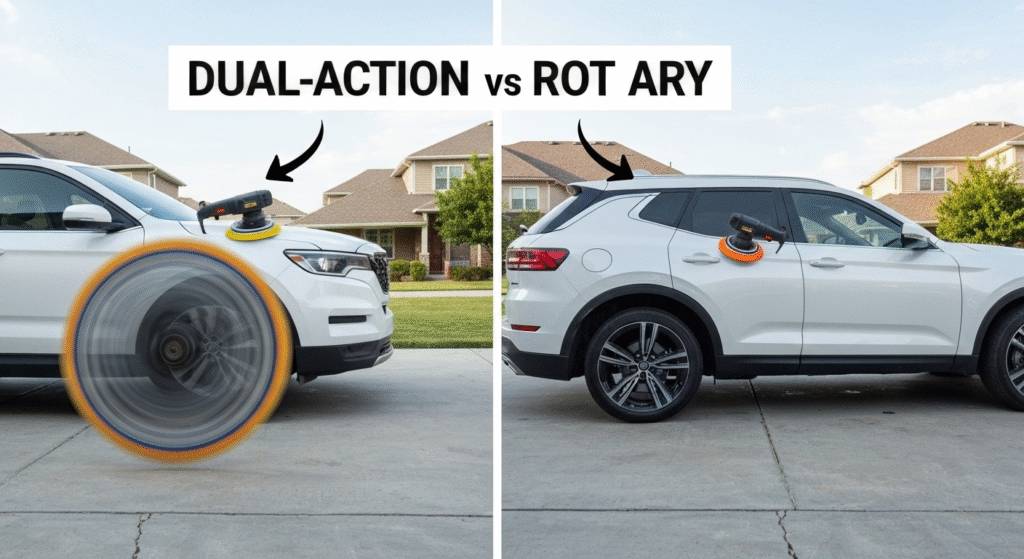
The choice between dual-action and rotary polishers determines your learning curve, safety margin, and final results. Each type serves different skill levels and project requirements.
FeatureDual-Action PolisherRotary PolisherBeginner FriendlyExcellentPoorPaint SafetyHighModerateCutting PowerModerateHighHeat GenerationLowHighPrice Range$100-$400$150-$600Learning Curve1-2 sessions10+ sessions
Dual-Action Polisher Advantages
Dual-action polishers excel in safety and ease of use. The random orbital motion prevents the concentrated heat buildup that burns paint. Even if you hold the machine in one spot too long, the oscillating motion spreads the friction across a larger area.
I recommend dual-action polishers to 90% of my clients. They deliver professional results with minimal risk. During my workshops, complete beginners achieve excellent results on their first attempt with these machines.
Key Benefits:
- Virtually impossible to burn paint
- No swirl mark creation
- Works with all polish types
- Suitable for all paint types
- Easy to control
Rotary Polisher Considerations
Rotary polishers offer superior cutting power for heavily damaged paint. They remove deep scratches, oxidation, and severe swirl marks faster than dual-action machines. However, they require significant skill and experience.
Professional detailers use rotary polishers for correction work on classic cars or severely neglected vehicles. The concentrated cutting action removes defects that dual-action machines cannot touch.
When to Consider Rotary:
- Severe paint oxidation
- Deep scratch removal
- Professional detailing business
- Extensive experience required
- Heat-sensitive paint risks
Essential Features to Look for in Your First Orbital Polisher
Selecting the right features ensures your polisher meets both current needs and future projects. Focus on these critical elements when comparing models.
Variable Speed Control
Speed control allows you to match the machine’s aggressiveness to your polish type and paint condition. Compounds require higher speeds (4-5 setting) for cutting power. Finishing polishes work best at lower speeds (2-3 setting) to avoid creating heat.
Quality polishers offer 6-speed settings with smooth transitions. Avoid machines with only high/low options – they limit your versatility and control.
Motor Power and Type
Motor specifications directly impact performance and longevity. Look for machines with 700-900 watt motors for optimal balance between power and control. Higher wattage doesn’t always mean better performance for beginners.
Motor Types Comparison:
Motor TypePower DeliveryHeat GenerationDurabilityBest ForBrushedConsistentModerateGoodBeginnersBrushlessVariableLowExcellentProfessionals
Ergonomics and Weight
Comfort becomes critical during extended polishing sessions. Machines weighing 4-6 pounds offer the best balance between stability and maneuverability. Heavier units cause fatigue; lighter models lack the mass needed for effective cutting.
Handle design matters more than most buyers realize. Rubberized grips prevent slipping during long sessions. Side handles should position naturally without causing wrist strain.
Backing Plate Size
Backing plate diameter affects both efficiency and precision. Standard sizes include 5-inch and 6-inch options, each serving different purposes.
5-Inch Backing Plates:
- Better for curved surfaces
- More precise control
- Easier panel navigation
- Reduced pad cost
6-Inch Backing Plates:
- Faster large panel coverage
- More stable operation
- Professional efficiency
- Higher pad costs
Most beginners benefit from 5-inch systems. They’re easier to control and work well on all vehicle sizes. You can always upgrade to 6-inch later as your skills develop.
Top Orbital Polisher Recommendations by Budget
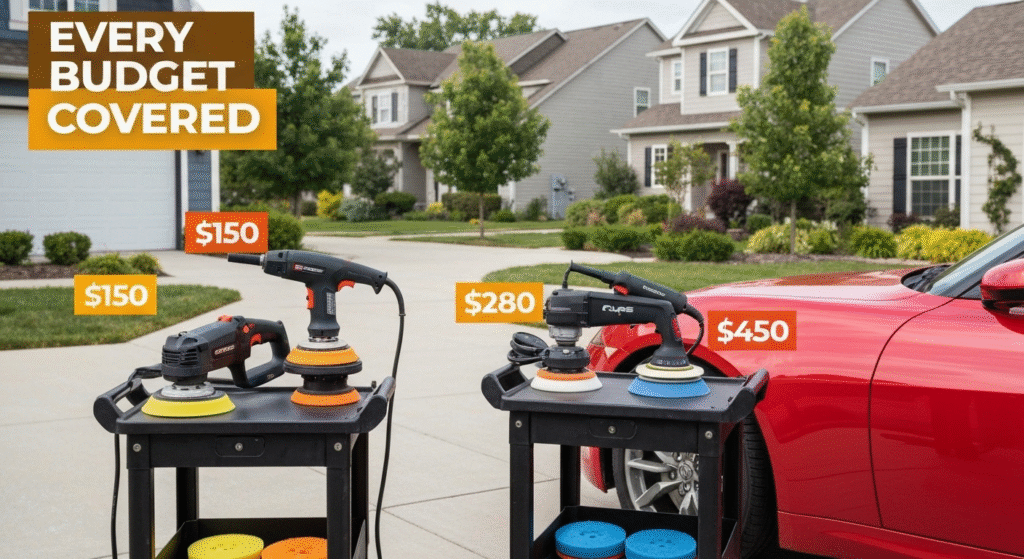
Real-world testing reveals clear winners in each price category. These recommendations come from extensive use across different skill levels and project types.
Budget Category ($100-$200)
Porter-Cable 7424XP: This machine launched thousands of DIY detailing journeys. The 4.5-amp motor provides adequate power for most polishing tasks. Variable speed control (2,500-6,800 OPM) handles everything from heavy compounds to final glazes.
After using this model in my workshop for three years, I can confirm its reliability. Students learn proper technique without worrying about paint damage. The 5-inch backing plate works perfectly for beginners.
Pros:
- Proven reliability
- Excellent safety record
- Wide aftermarket support
- Easy parts availability
Cons:
- Basic speed control
- No soft start feature
- Limited ergonomics
- Moderate power output
Mid-Range Category ($200-$350)
Griot’s Garage G9: This polisher represents the sweet spot for serious enthusiasts. The 850-watt motor delivers professional-level power while maintaining dual-action safety. The 15-foot cord eliminates most extension cord needs.
What sets the G9 apart is its build quality. The gear housing uses metal components instead of plastic. After two years of regular use, my G9 shows no wear signs. The variable speed dial offers precise control between 2,400-5,900 OPM.
Chemical Guys TORQX: Another excellent mid-range option with unique features. The 700-watt motor provides smooth operation across all speed ranges. The rubberized housing reduces vibration and improves grip comfort.
Professional Category ($350-$500)
Rupes LHR15ES: The gold standard for dual-action polishers. This Italian-made machine features a 500-watt motor optimized for efficiency over raw power. The 15mm orbit creates exceptional finishing quality.
Professional detailers worldwide rely on Rupes machines. The build quality justifies the premium price. Every component feels precision-engineered. The variable speed control offers 6 settings from 1,000-4,000 RPM.
During my professional work, the Rupes consistently delivers flawless results. Paint correction that takes 45 minutes with other machines requires only 30 minutes with the LHR15ES.
Choosing the Right Pads and Polish Combinations
Pad selection determines your polisher’s effectiveness more than the machine itself. Understanding pad types and polish combinations unlocks professional results.
Foam Pad Categories
Foam pads vary in density and aggressiveness. Each type serves specific correction and finishing needs.
Pad TypeDensityPurposePolish TypeResultsHeavy CutFirmScratch removalCompoundDefect correctionMedium CutMediumSwirl removalPolishPaint refinementLight CutSoftFine polishingFinishing polishGloss enhancementFinishingUltra-softFinal stepGlaze/WaxMaximum gloss
Polish and Compound Selection
Polish chemistry must match your pad choice and correction needs. Using aggressive compounds on soft pads wastes time and product. Conversely, finishing polishes on cutting pads won’t remove defects.
Compound Characteristics:
- Removes 1200-2000 grit scratches
- Contains aggressive abrasives
- Requires cutting pads
- Higher machine speeds (4-5 setting)
Polish Properties:
- Removes 2000-3000 grit marks
- Moderate abrasive content
- Works with medium pads
- Medium speeds (3-4 setting)
Finishing Polish Features:
- Removes 3000+ grit marks
- Minimal abrasives
- Requires soft pads
- Lower speeds (2-3 setting)
Step-by-Step Guide: Using Your First Orbital Polisher
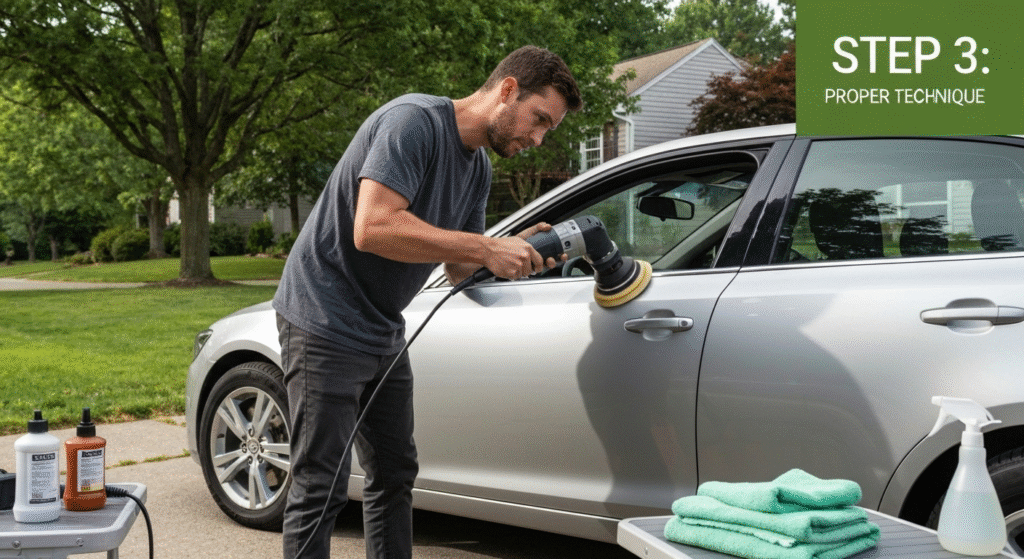
Proper technique ensures safe, effective polishing results. Follow these steps exactly during your first sessions to build confidence and muscle memory.
Pre-Polishing Preparation
Clean your vehicle thoroughly before polishing. Any dirt or debris becomes sandpaper under the pad, creating new scratches while you try to remove existing ones.
Wash the car using proper two-bucket method. Clay bar the surface to remove embedded contaminants. Work in shade with cool paint temperatures. Direct sunlight causes polish to dry too quickly.
Machine Setup and Testing
Install the backing plate by threading it clockwise onto the drive shaft. Hand-tighten only – excessive force damages the threads. Attach your chosen pad by centering it on the backing plate and pressing firmly.
Apply 4-5 dime-sized drops of polish to the pad surface. Spread these drops evenly by dabbing the pad against the paint before starting the machine. This prevents product from flying off during startup.
Polishing Technique
Start the machine at speed setting 2 while the pad touches the paint. This prevents splatter and allows smooth product spreading. Work the polish into the paint using overlapping 2-foot sections.
Maintain light, consistent pressure – let the machine do the work. Heavy pressure generates heat and reduces effectiveness. Move the polisher in straight lines with 50% overlap between passes.
Proper Motion Patterns:
- Horizontal passes first
- Vertical passes second
- 50% overlap each direction
- Consistent 2-3 inch/second speed
- Light pressure throughout
Section Completion and Inspection
Work each section for 3-4 passes in each direction. The polish should become nearly transparent, indicating proper breakdown. Wipe away residue with a clean microfiber towel immediately.
Inspect your work under good lighting before moving to the next section. Look for remaining defects, haze, or missed spots. Address any issues before the polish fully cures.
Common Beginner Mistakes and How to Avoid Them
Learning from others’ mistakes accelerates your skill development. These errors appear in 80% of first-time polishing attempts.
Excessive Pressure Application
New users often think more pressure equals better results. The opposite is true. Excessive pressure generates heat, reduces pad life, and can burn paint on darker vehicles.
I’ve seen beginners press so hard they slow the machine’s rotation. This defeats the polish’s chemical action and creates more problems than it solves. Let the machine’s weight provide sufficient pressure.
Working Panels When Too Hot
Direct sunlight makes panels too hot for safe polishing. Polish dries before proper chemical action occurs. This creates haze, streaking, and potential paint damage.
Always work in shade or during cooler parts of the day. Touch the paint with your hand – it should feel cool or slightly warm. Hot panels require waiting or finding shade.
Using Wrong Speed Settings
Each polish type requires specific speed ranges for optimal performance. Compounds need higher speeds for cutting action. Finishing polishes require lower speeds to prevent heating.
Speed mistakes waste time and products while delivering poor results. Start conservatively and increase speed only if needed. Most polishing happens at moderate speeds (3-4 setting).
Inadequate Product Application
Too little polish prevents proper defect removal. Too much polish creates unnecessary mess and waste. The sweet spot is 4-5 dime-sized drops per 2-square-foot section.
Spread the polish evenly across the pad before starting. This prevents concentrated spots that can cause streaking or uneven correction.
Maintenance and Care for Long-Term Performance
Proper maintenance extends your polisher’s life and maintains consistent performance. These simple steps prevent most common failures.
Post-Use Cleaning
Clean the machine thoroughly after each use. Polish residue hardens and damages internal components over time. Remove the backing plate and pad, then wipe all surfaces with damp microfiber towels.
Pay special attention to ventilation slots where polish accumulates. Use compressed air or soft brushes to remove buildup. Clean air intake prevents overheating during future use.
Pad Care and Storage
Quality pads last 15-20 uses with proper care. Rinse pads immediately after use with warm water. Work out embedded polish by hand, then allow complete air drying.
Store clean, dry pads in a ventilated container. Avoid plastic bags that trap moisture and cause mold growth. Replace pads when they lose shape or show excessive wear.
Long-Term Storage
Store your polisher in a clean, dry location. Avoid extreme temperatures that affect motor components. Run the machine for 2-3 minutes monthly during storage to maintain internal lubrication.
Check power cords regularly for damage. Replace frayed or cracked cords immediately to prevent safety hazards. Annual professional service extends machine life significantly.
Frequently Asked Questions
Can I use an orbital polisher on all paint types? Yes, dual-action polishers work safely on all modern automotive paints including clear coat, single stage, and ceramic coated surfaces. Always test in an inconspicuous area first and use appropriate polish for your paint type.
How often should I polish my car? Most vehicles need polishing 1-2 times per year depending on usage and storage conditions. Daily drivers in harsh climates may require quarterly treatment, while garage-kept vehicles might need annual polishing only.
What’s the difference between polishing and waxing? Polishing removes paint defects and restores gloss through abrasive action. Waxing adds a protective layer over the paint but doesn’t correct existing damage. Polish first, then wax for optimal results.
Do I need different pads for different colors? Dark colors show defects more easily but don’t require different pads. Use the same pad selection based on correction needs rather than paint color. Light colors hide minor imperfections better than dark paints.
Conclusion
Choosing your first orbital polisher sets the foundation for years of satisfying automotive detailing. Focus on dual-action machines for safety and ease of learning. Invest in quality pads and appropriate polishes to maximize your machine’s potential.
Start with moderate expectations and practice on less visible panels first. Master basic techniques before attempting challenging correction work. Remember that consistent, light pressure produces better results than aggressive approaches.
The journey from nervous beginner to confident detailer takes time and practice. Your first orbital polisher purchase marks the beginning of this rewarding hobby. Choose wisely, practice regularly, and enjoy the transformation of your vehicle’s appearance.