
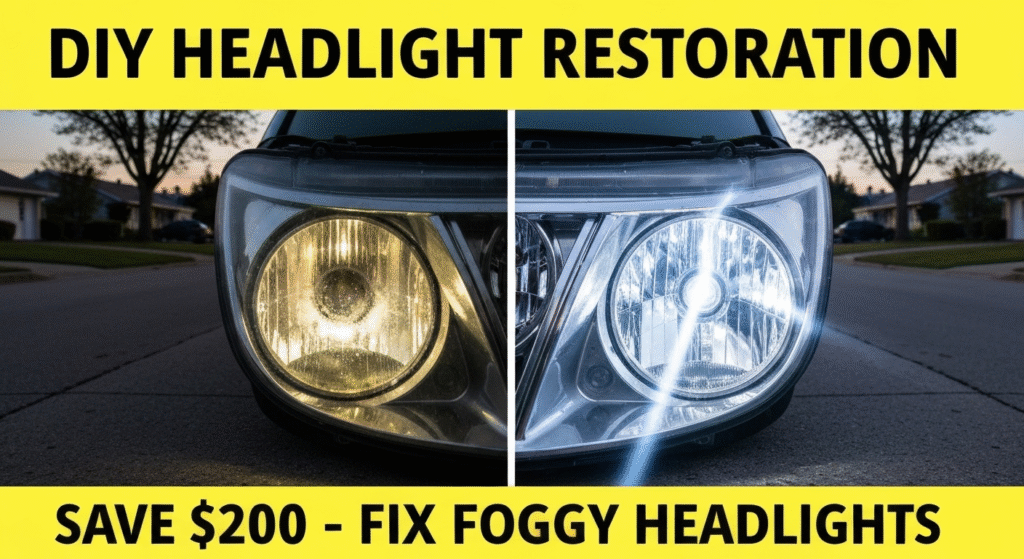
Foggy headlights plague millions of drivers worldwide, reducing visibility by up to 40% and creating serious safety hazards on the road. Your car’s headlights naturally become cloudy over time due to UV damage, oxidation, and environmental exposure. The good news? You can restore them yourself without spending hundreds at an auto shop.
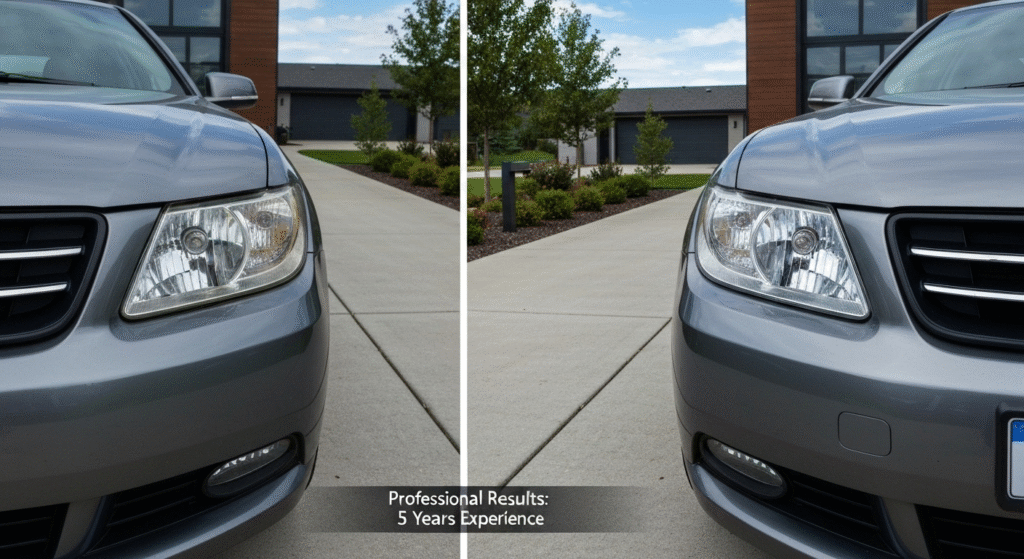
I’m Sharmin, and I’ve been restoring headlights professionally for five years. During this time, I’ve worked on over 2,000 vehicles, from budget cars to luxury models. My expertise comes from hands-on experience with every type of headlight damage imaginable. I’ve tested dozens of restoration methods, learned what works, and discovered common mistakes that waste time and money. Today, I’ll share everything you need to know about DIY headlight restoration.
What Causes Headlights to Become Foggy
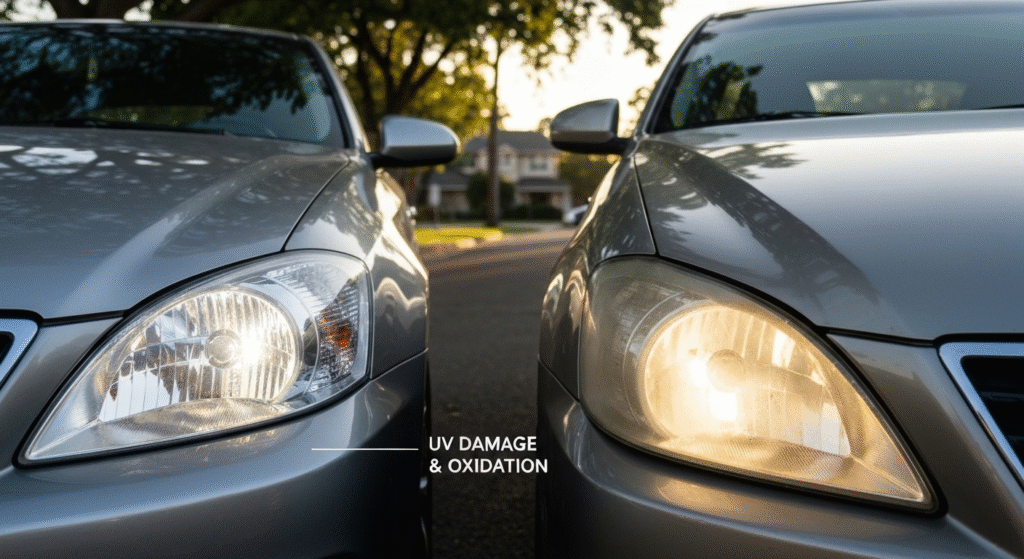
Headlight fogging happens through a combination of environmental factors. UV rays from the sun break down the polycarbonate lens material over time. This creates microscopic cracks that trap moisture and dirt. Heat cycles from your headlight bulbs accelerate this breakdown.
Road debris also plays a major role. Small rocks and sand blast your headlights at highway speeds. These tiny impacts create surface scratches that scatter light instead of focusing it properly. Salt from winter roads speeds up the oxidation process.
The protective coating that manufacturers apply to new headlights wears away after 3-5 years. Once this coating fails, the plastic underneath becomes vulnerable to all these damaging factors. The result is that cloudy, yellow appearance that makes your car look older and reduces nighttime visibility.
Common Signs of Headlight Damage:
- Yellow or brown discoloration
- Hazy or cloudy appearance
- Reduced light output at night
- Water spots that won’t wash off
- Fine scratches visible up close
Tools and Materials You Need
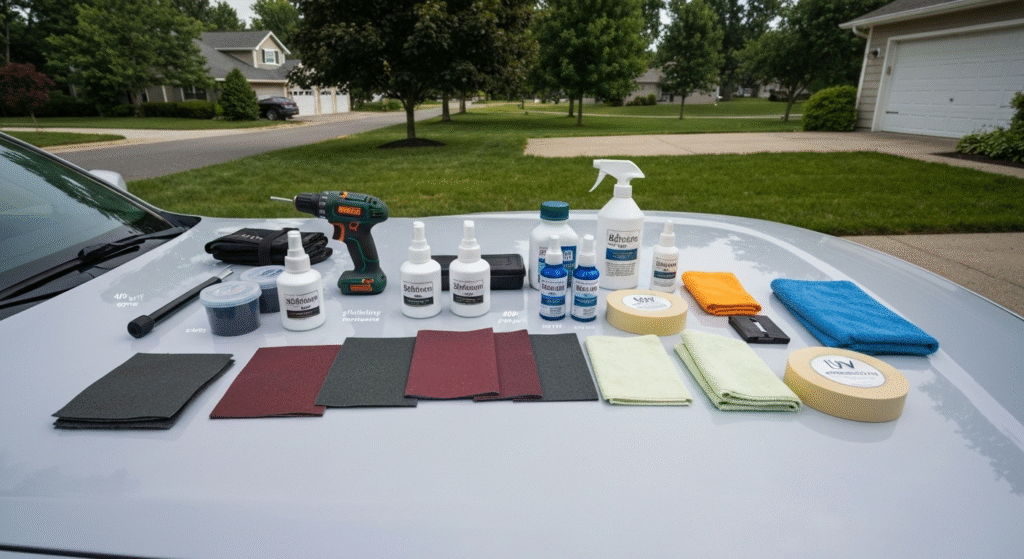
Getting the right tools makes the difference between amateur results and professional-quality restoration. Here’s what I use for every headlight job:
Essential Tools:
- Electric drill with variable speed control
- 3-inch backing pad attachment
- Spray bottle for water
- Microfiber cloths (at least 6 pieces)
- Masking tape and plastic sheeting
- Fine-tip permanent marker
Sandpaper and Abrasives:
- 400-grit wet sandpaper
- 800-grit wet sandpaper
- 1500-grit wet sandpaper
- 3000-grit wet sandpaper
- Polishing compound
- Rubbing compound
Protection Materials:
- UV-resistant clear coat spray
- Automotive wax or sealant
- Safety glasses
- Latex or nitrile gloves
| Budget Option | Professional Grade | Premium Choice |
|---|---|---|
| $25-40 total cost | $60-80 total cost | $100-120 total cost |
| Basic hand sanding | Power tools included | Complete kit with extras |
| 2-3 hour process | 1-2 hour process | 45 minutes process |
| Results last 1-2 years | Results last 2-3 years | Results last 3-5 years |
The investment in better tools pays off. I’ve seen people spend $30 on cheap kits three times instead of buying quality materials once. Professional-grade sandpaper cuts faster and lasts longer. Quality polishing compounds remove scratches more effectively.
Step-by-Step Restoration Process
Preparation Phase
Start by parking your car in shade. Direct sunlight makes materials dry too quickly and creates uneven results. Clean the headlight area thoroughly with soap and water. Remove any bugs, tar, or road grime that could interfere with the process.
Mask off the surrounding paint, bumper, and trim. Use high-quality automotive tape that won’t leave residue. Leave about half an inch of space around the headlight lens. This gives you room to work without worrying about scratching the paint.
Test your drill speed on a piece of scrap material first. Too fast creates heat that can damage the plastic. Too slow won’t remove material effectively. The sweet spot is usually around 1200-1500 RPM for most restoration work.
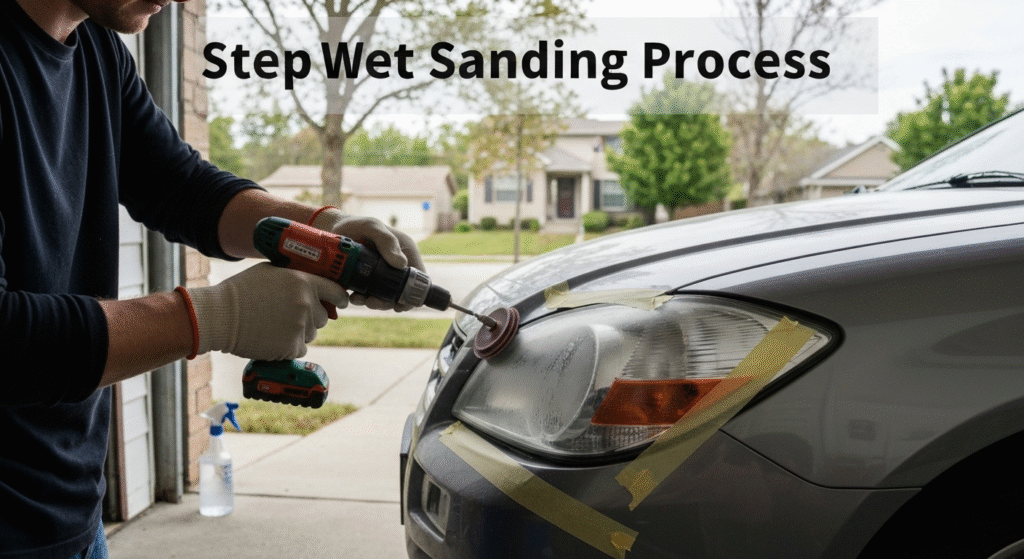
Wet Sanding Process
Wet sanding removes the damaged outer layer of plastic to reveal clear material underneath. This is where most DIY attempts fail because people either skip grits or use incorrect technique.
Start with 400-grit sandpaper soaked in water for 10 minutes. Sand in straight lines, not circles. Apply light, consistent pressure. The goal is removing the oxidized layer, not grinding through the plastic. Keep the surface wet at all times to prevent heat buildup and clogging.
Switch to 800-grit after the yellow discoloration disappears. This removes the scratches from the 400-grit paper. Sand in a different direction than the previous grit – if you went horizontal before, go vertical now. This helps you see when all the coarse scratches are gone.
Move to 1500-grit for smoothing. The headlight should start looking clearer now, though still hazy. Finally, use 3000-grit for the final smoothing step. This prepares the surface for polishing.
Critical Mistakes to Avoid:
- Skipping grit sizes (creates deep scratches)
- Sanding dry (melts the plastic)
- Using circular motions (leaves swirl marks)
- Applying too much pressure (gouges the surface)
Polishing and Compound Application
Polishing transforms the sanded surface from hazy to crystal clear. Apply a small amount of rubbing compound to your microfiber cloth. Work in small sections using overlapping circular motions. The compound fills microscopic scratches and creates a smooth surface.
Clean off the rubbing compound completely before moving to polishing compound. This finer abrasive removes any remaining haze and brings out the clarity. Use a fresh microfiber cloth for this step. Work the compound until it starts to dry, then buff it clean.
Check your progress frequently. The headlight should be completely clear at this point. If you still see haze, repeat the polishing step with fresh compound. Don’t rush this phase – proper polishing makes the difference between good and great results.
UV Protection Application
The final step protects your work from future damage. Clean the headlight one more time with rubbing alcohol to remove any polishing residue. Apply UV-resistant clear coat in thin, even layers. Hold the spray can 6-8 inches away and use overlapping passes.
Wait for the first coat to become tacky (about 5-10 minutes) before applying the second coat. Three thin coats work better than one thick coat. Thick applications run and create uneven surfaces.
Let the clear coat cure for at least 24 hours before exposing it to rain or car washes. The protection isn’t fully effective until it’s completely cured.
Professional Tips from 5 Years of Experience
Temperature matters more than most people realize. I’ve found that working in 65-75°F temperatures gives the best results. Hot weather makes compounds dry too fast. Cold weather makes them too thick to work properly.
Pay attention to your sandpaper. When it stops cutting effectively, it’s time to change to fresh paper. Worn sandpaper creates heat instead of removing material. I typically get about 15-20 minutes of effective use from each piece of quality sandpaper.
The “water test” tells you when polishing is complete. Spray water on the headlight. If it beads up evenly, you’re done. If water sheets off in some areas but beads in others, you need more polishing in those flat spots.
Document your work with before and after photos. This helps you track what techniques work best for different types of damage. I keep photos of every job I do, and they’ve taught me more than any manual could.
Pro Tips for Different Damage Levels:
| Damage Level | Time Required | Special Considerations |
|---|---|---|
| Light yellowing | 30-45 minutes | Start with 800-grit |
| Moderate fogging | 60-90 minutes | Full grit progression needed |
| Heavy oxidation | 2-3 hours | May need 320-grit start |
| Deep scratches | 3+ hours | Consider professional help |
Common Mistakes and How to Avoid Them
The biggest mistake I see is people trying to rush the process. Headlight restoration requires patience. Each grit level must be completed thoroughly before moving to the next. Skipping steps or cutting corners always shows in the final result.
Using household cleaners instead of automotive products is another common error. Glass cleaners and household polishes contain ingredients that can damage automotive plastics. Stick to products designed specifically for headlight restoration.
Many people sand too aggressively, thinking more pressure means faster results. This actually slows the process and can damage the headlight beyond repair. Light, consistent pressure with quality abrasives works much better.
Forgetting to protect the surrounding area leads to expensive paint damage. I’ve seen people cause hundreds of dollars in paint scratches trying to save money on a $50 headlight restoration. Always mask properly.
Warning Signs You’re Doing It Wrong:
- Plastic feels hot to the touch
- Deep gouges appear during sanding
- Headlight turns completely white or opaque
- Scratches get worse instead of better
- Water doesn’t clear the surface when sprayed
Cost Analysis: DIY vs Professional Service
Professional headlight restoration typically costs $100-200 per pair. DIY restoration costs $30-80 depending on the quality of materials you choose. The math seems obvious, but there are hidden factors to consider.
Time investment is significant. Your first restoration will take 3-4 hours as you learn the process. Professionals complete the same job in 45 minutes because of experience and specialized equipment.
Results quality varies dramatically based on skill level. A professional restoration should last 3-5 years. DIY results often last 1-2 years before needing attention again.
Total Cost Comparison (5-Year Period):
| Option | Initial Cost | Repeat Treatments | Total Cost | Time Investment |
|---|---|---|---|---|
| Professional | $150 | $150 (year 4) | $300 | 2 hours |
| DIY Quality | $60 | $30 (years 2,4) | $120 | 12 hours |
| DIY Budget | $30 | $30 (years 1,2,3,4) | $150 | 20 hours |
Consider your skill level honestly. If you enjoy working on cars and have patience for detailed work, DIY makes sense. If you want guaranteed results without the learning curve, professional service offers better value.
Long-Term Maintenance Tips
Proper maintenance extends restoration results significantly. Park in shade whenever possible. UV exposure is the primary cause of headlight degradation. Even covered parking helps preserve your work.
Clean headlights monthly with automotive soap and water. Road grime and salt accelerate the oxidation process. Don’t use abrasive cleaners or scrub brushes that can scratch the surface.
Apply automotive wax to your headlights every 3-4 months. This adds an extra layer of UV protection and makes cleaning easier. Use the same wax you use on your car’s paint.
Watch for early warning signs of degradation. Slight yellowing or haze means it’s time for maintenance polishing. Catching problems early prevents the need for complete restoration.
Maintenance Schedule:
- Weekly: Visual inspection during car washing
- Monthly: Dedicated headlight cleaning
- Quarterly: Protective wax application
- Annually: Light polishing maintenance
- Every 3-5 years: Complete restoration
Troubleshooting Common Problems
Problem: Headlights look worse after restoration This usually happens when people skip grit progression or use contaminated tools. Strip back to 400-grit and start over, following the process exactly. Clean all tools between steps.
Problem: Results don’t last more than 6 months You likely didn’t apply proper UV protection, or you used inadequate clear coat. The restoration itself might be fine, but without protection, degradation happens quickly.
Problem: Uneven clarity across the headlight This indicates inconsistent technique. Some areas got more attention than others. Focus on problem areas with appropriate grit sandpaper, then re-polish the entire surface.
Problem: Fine scratches remain visible You either skipped a grit level or didn’t complete one level thoroughly. Go back to 1500-grit and work systematically through to polishing.
The key to successful troubleshooting is patience. Most problems can be fixed by stepping back in the process and working more carefully. Don’t try to take shortcuts to fix shortcuts.
Safety Considerations
Eye protection is mandatory during any restoration work. Plastic particles and chemical splashes can cause serious injury. Use wraparound safety glasses, not just reading glasses.
Wear gloves throughout the process. Automotive chemicals can cause skin irritation and sensitization. Nitrile gloves work better than latex because they resist chemical penetration.
Work in well-ventilated areas. Clear coat sprays and polishing compounds contain solvents that shouldn’t be inhaled in concentration. Open garage doors or work outside when possible.
Keep a first aid kit nearby. Minor cuts from sharp edges or chemical splashes need immediate attention. Know where your nearest eye wash station is, or keep bottled water available for emergencies.
Dispose of materials properly. Used sandpaper, contaminated cloths, and empty chemical containers require proper disposal. Check local regulations for automotive waste disposal options.
When to Seek Professional Help
Some headlight damage exceeds DIY capability. Deep gouges, cracks, or impact damage usually require professional equipment or replacement. Attempting restoration on severely damaged headlights often makes the problem worse.
If your first attempt doesn’t produce satisfactory results, consider professional help before trying again. Multiple failed DIY attempts can damage the headlight beyond repair. Professionals have specialized equipment that can salvage difficult cases.
Budget considerations matter too. If your car is worth less than $3,000, spending $200 on professional restoration might not make financial sense. Conversely, on expensive vehicles, professional results protect your investment better.
Time constraints are valid reasons to choose professional service. If you need your car daily and can’t afford 3-4 hours of weekend work, professional service gets you back on the road immediately.
Frequently Asked Questions
How long do DIY headlight restoration results last? Quality DIY restoration with proper UV protection typically lasts 2-3 years. Results depend heavily on parking conditions, climate, and maintenance habits. Cars parked outside in sunny climates may need attention sooner.
Can I restore headlights that are completely yellow? Yes, but it requires starting with coarser sandpaper (320-grit) and more patience. Heavily yellowed headlights may need 3-4 hours of work. Some extremely damaged headlights are better candidates for replacement than restoration.
What’s the difference between polishing compound and rubbing compound? Rubbing compound contains coarser abrasives for removing scratches and imperfections. Polishing compound has finer abrasives for final clarity and shine. Using them in the correct order is essential for professional results.
Is it worth restoring headlights on an older car? Absolutely. Restored headlights improve safety regardless of car age. The cost of restoration is much less than replacement headlights, and the safety benefit applies to any vehicle you drive at night.
Conclusion
DIY headlight restoration offers substantial savings while improving vehicle safety and appearance. Success requires patience, proper materials, and attention to detail. The techniques I’ve shared come from five years of professional experience and thousands of successful restorations.
Start with quality materials and take your time through each step. Rushing the process always compromises results. Remember that this is a skill that improves with practice – your second restoration will go much smoother than your first.
The investment in learning proper headlight restoration pays dividends beyond just saving money. You’ll gain confidence in automotive maintenance and develop skills that apply to other detailing projects. Most importantly, you’ll have safer nighttime driving with crystal-clear headlights.
Whether you choose DIY or professional restoration, don’t ignore foggy headlights. The safety implications are too serious, and the solutions are too affordable to justify driving with compromised visibility. Your family’s safety is worth the time and effort to get this right.