
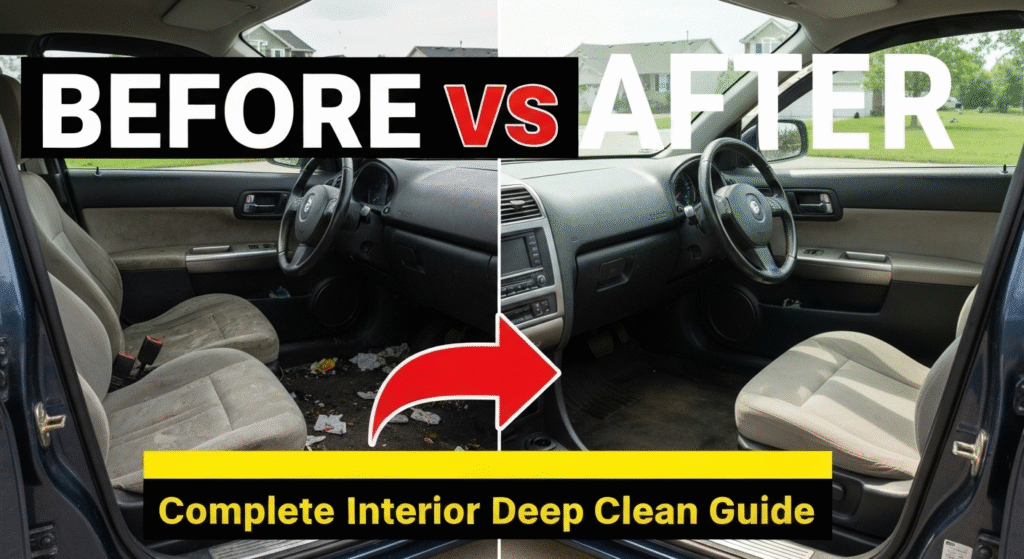
Deep cleaning your car’s interior transforms your daily driving experience from dealing with stains and odors to enjoying a fresh, spotless environment. Most car owners struggle with this task because they lack the right methods and products. This comprehensive guide will show you exactly how to achieve professional results at home.
My name is Sharmin, and I’ve spent the last five years as a professional automotive detailer specializing in interior restoration. During this time, I’ve cleaned over 2,000 vehicles, from luxury cars with leather seats to family SUVs with years of accumulated mess. My expertise comes from hands-on experience with every type of interior material and stain imaginable. I’ve worked with dealerships, rental companies, and private clients, developing techniques that save time while delivering exceptional results.
What sets my approach apart is focusing on methods that actually work in real-world conditions. I’ve tested countless products and refined my processes through trial and error. This guide shares the exact techniques I use daily in my professional work.
Why Deep Cleaning Your Car Interior Matters
Your car’s interior endures constant exposure to dirt, spills, body oils, and environmental contaminants. Regular surface cleaning only addresses visible dirt, leaving deeper problems untouched. Deep cleaning removes embedded particles, eliminates odor sources, and protects your investment.
Here’s what happens when you skip deep cleaning:
- Fabric fibers trap allergens and bacteria
- Leather develops permanent stains and cracks
- Plastic surfaces become permanently discolored
- Resale value drops significantly
Professional deep cleaning costs between $150-300, but doing it yourself saves money while giving you complete control over the process.
Essential Tools and Supplies You’ll Need
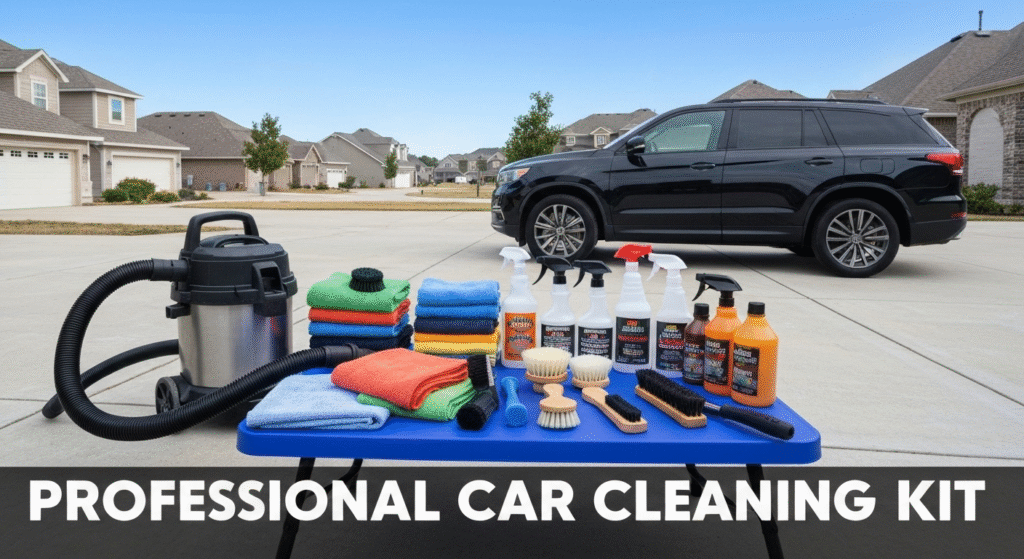
Basic Equipment
- Wet/dry vacuum with attachments
- Microfiber cloths (at least 10-12 pieces)
- Soft-bristled brushes (various sizes)
- Steam cleaner or hot water extractor
- Compressed air canister
Cleaning Products
- All-purpose interior cleaner
- Leather cleaner and conditioner
- Fabric upholstery cleaner
- Glass cleaner (ammonia-free)
- Protectant spray for plastics
Specialized Items
- Cotton swabs for detailed work
- Plastic trim removal tools
- Foam applicator pads
- Clean towels for drying
| Tool Category | Essential Items | Optional Upgrades |
|---|---|---|
| Vacuum Equipment | Wet/dry shop vacuum | Professional extractor |
| Cleaning Cloths | Basic microfiber set | Premium waffle-weave cloths |
| Brushes | Soft detail brushes | Electric scrub brush |
| Chemical Products | Multi-surface cleaner | Specialized leather care kit |
Preparing Your Car for Deep Cleaning
Start by removing everything from your vehicle. Check under seats, in door pockets, glove compartments, and console storage areas. Remove floor mats and shake them out thoroughly.
Take photos of your interior before starting. This helps you track progress and remember how removable parts fit back together.
Position your car in a shaded area with good ventilation. Direct sunlight causes cleaning products to dry too quickly, leaving residue. Open all doors and windows to ensure proper airflow during the cleaning process.
Pre-Cleaning Checklist
- Remove all personal items
- Take out floor mats
- Vacuum loose debris
- Check for valuable items
- Photograph interior layout
Step 1: Thorough Vacuuming Strategy
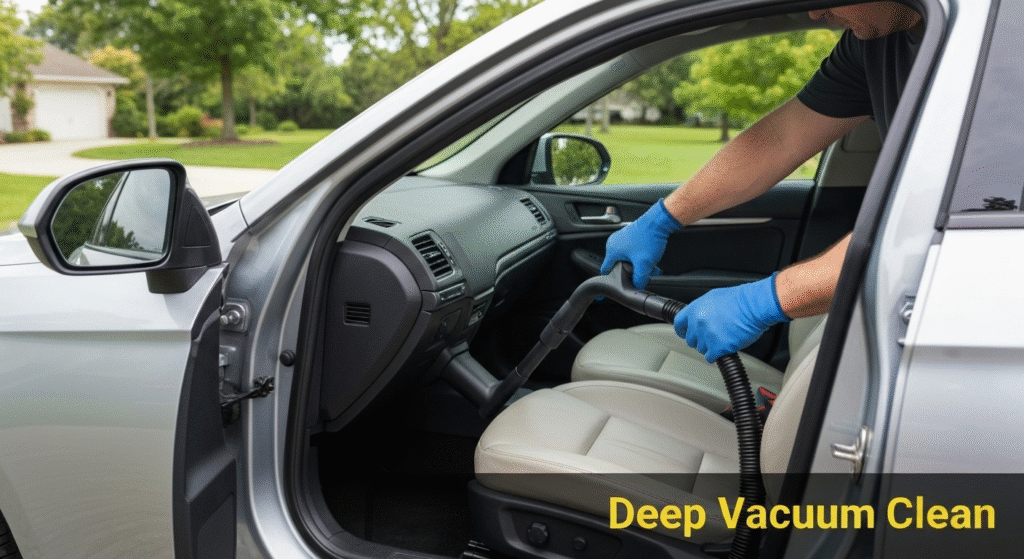
Effective vacuuming requires systematic approach. Start with the ceiling and work downward to prevent redistributing dirt onto cleaned surfaces.
Use the crevice tool for tight spaces between seats and console areas. The brush attachment works best for dashboard and door panel surfaces. Switch to the upholstery tool for fabric seats and carpets.
Pay special attention to these often-missed areas:
- Seat track mechanisms
- Air vent slats
- Cup holder bases
- Door handle recesses
Vacuum each surface multiple times from different angles. Dirt hides in fabric weave patterns and gets trapped in plastic textures. I typically spend 20-30 minutes just on vacuuming because it’s the foundation of effective cleaning.
Professional Vacuuming Technique
Move the vacuum head slowly across surfaces. Quick passes don’t allow enough suction time to lift embedded particles. For fabric seats, use overlapping strokes in different directions to lift dirt from various angles.
Step 2: Cleaning Fabric Upholstery
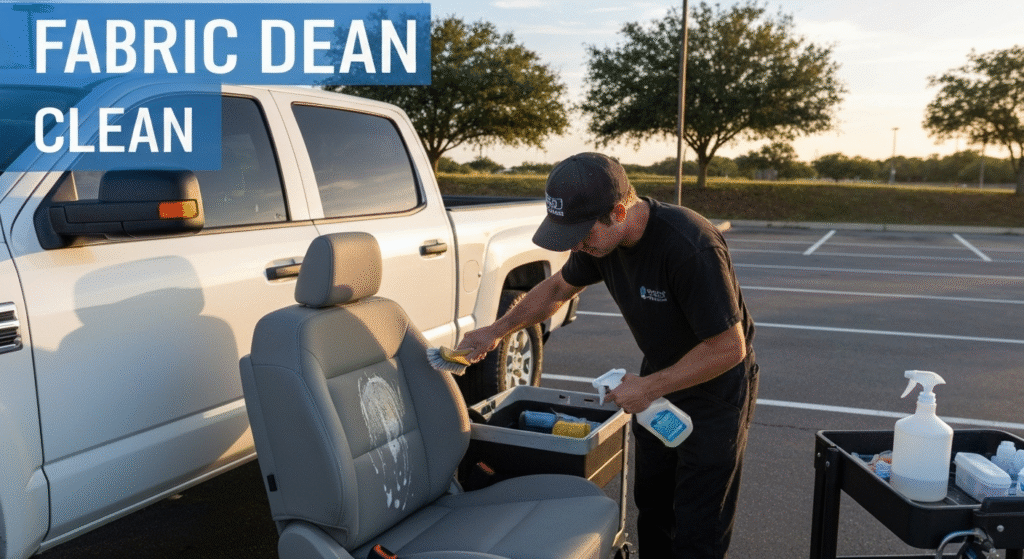
Fabric seats and door panels require careful attention to avoid oversaturation. Test your cleaning product in an inconspicuous area first to check for colorfastness.
Spray the cleaner onto a small section, not the entire seat at once. Work the product in with a soft brush using circular motions. The goal is lifting dirt to the surface where your extractor or wet vacuum can remove it.
Common Fabric Cleaning Mistakes:
- Using too much water (causes mold growth)
- Scrubbing too aggressively (damages fibers)
- Not extracting enough moisture (leaves residue)
- Mixing different cleaning products (can cause reactions)
After cleaning each section, extract as much moisture as possible. Use fans or open windows to speed drying time. Fabric should be completely dry within 2-4 hours.
Dealing with Specific Stains
Food Spills: Blot first, never rub. Apply enzyme cleaner and let it work for 10 minutes before extraction.
Pet Odors: Use enzymatic cleaners specifically designed for pet accidents. Standard cleaners mask odors temporarily but don’t eliminate the source.
Grease Marks: Dish soap mixed with warm water breaks down oil-based stains effectively.
Step 3: Leather Care and Conditioning
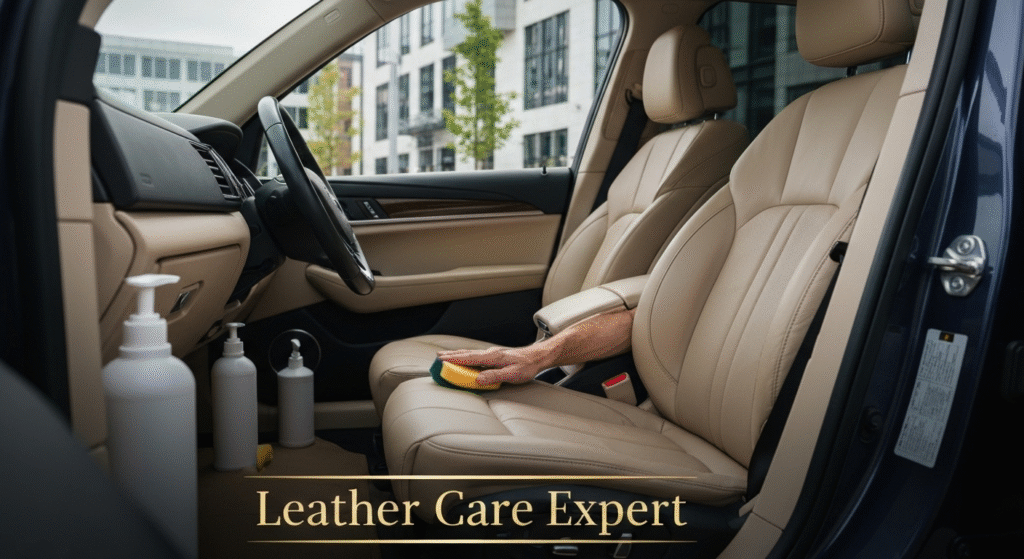
Leather requires different treatment than fabric. Never use harsh chemicals or excessive water on leather surfaces. Start with a specialized leather cleaner applied to a microfiber cloth, not directly onto the leather.
Clean one section at a time, working the product into the leather’s grain pattern. Remove cleaning residue with a slightly damp cloth, then dry completely before applying conditioner.
Leather Conditioning Process
Wait 30 minutes after cleaning before conditioning. Apply conditioner sparingly using a foam applicator pad. Work it into the leather using circular motions, paying attention to high-wear areas like seat bolsters and steering wheel contact points.
| Leather Type | Cleaning Frequency | Conditioning Frequency |
|---|---|---|
| Daily Use Vehicles | Monthly | Every 2-3 months |
| Weekend Cars | Every 2-3 months | Every 6 months |
| Show Cars | As needed | Every 3-4 months |
Buff away excess conditioner after 15-20 minutes. Properly conditioned leather should feel supple without being greasy or sticky.
Step 4: Dashboard and Hard Surface Cleaning
Plastic and vinyl surfaces accumulate oils, dust, and UV damage over time. Use an all-purpose cleaner diluted according to manufacturer instructions. Avoid products containing silicone, which attracts dirt and creates a slippery film.
Start with the upper dashboard areas and work downward. Use cotton swabs for detailed work around buttons, vents, and small crevices. A soft brush helps remove dirt from textured plastic surfaces.
Critical Areas to Focus On:
- Air conditioning vents
- Radio and climate controls
- Gear shifter area
- Door handles and armrests
Protecting Plastic Surfaces
After cleaning, apply a water-based protectant to prevent UV damage and fading. Avoid oil-based products that create excessive shine and attract dust. The goal is protection, not a glossy appearance.
Step 5: Window and Mirror Cleaning
Interior glass cleaning requires different techniques than exterior surfaces. Use ammonia-free glass cleaner to avoid damaging tinted windows or leaving chemical odors in the cabin.
Clean windows in sections, working from top to bottom. Use one microfiber cloth for applying cleaner and a second dry cloth for buffing to a streak-free finish.
Professional Window Cleaning Tips
- Clean glass when cool to touch
- Use circular motions for application
- Finish with straight vertical strokes
- Check for streaks from different angles
Rearview mirrors need gentle handling. Clean carefully around automatic dimming sensors and avoid getting moisture in electronic components.
Step 6: Deep Cleaning Floor Mats and Carpets
Remove floor mats for separate cleaning. Rubber mats can be scrubbed with stronger degreasers, while fabric mats need gentler treatment similar to upholstery.
For vehicle carpets, use hot water extraction if available. This method removes deep-seated dirt and allergens that regular vacuuming misses. Work in small sections to prevent oversaturation.
Carpet Cleaning Process:
- Pre-treat stained areas
- Apply cleaning solution evenly
- Agitate with soft brush
- Extract thoroughly
- Speed dry with fans
Odor Elimination Strategies
Persistent odors often come from moisture trapped in carpet padding. After cleaning, ensure complete drying to prevent mold and mildew growth. Use moisture-absorbing products like activated charcoal or baking soda for stubborn odors.
Step 7: Final Details and Protection
Once all surfaces are clean and dry, apply appropriate protectants. Leather needs conditioning products, while fabric can benefit from stain-resistant treatments. Plastic surfaces should receive UV protection.
Check your work under different lighting conditions. Natural daylight reveals streaks and missed spots that artificial lighting might hide.
Quality Control Checklist
- No cleaning residue visible
- All surfaces completely dry
- No strong chemical odors
- Even appearance across similar materials
- All removed items properly reinstalled
Common Mistakes to Avoid
Using Household Cleaners: Products designed for home use can damage automotive materials. Stick to automotive-specific cleaners.
Oversaturating Materials: Too much water causes mold, mildew, and material damage. Use products sparingly.
Mixing Cleaning Products: Different chemicals can react dangerously. Use one product at a time.
Ignoring Drying Time: Rushing the drying process leads to odors and potential damage.
Skipping Protection: Clean surfaces need protection from UV rays and future contamination.
Maintenance Between Deep Cleans
Regular maintenance extends the time between deep cleaning sessions. Vacuum weekly, address spills immediately, and use protectant products monthly.
Keep basic cleaning supplies in your vehicle for quick cleanup. Microfiber cloths, all-purpose cleaner, and glass cleaner handle most situations.
Monthly Maintenance Schedule
- Week 1: Vacuum and quick wipe-down
- Week 2: Detail cleaning of high-touch areas
- Week 3: Glass cleaning and dashboard protection
- Week 4: Floor mat cleaning and leather conditioning
Troubleshooting Common Issues
Persistent Odors: Often indicate moisture problems or organic material decomposition. Professional ozone treatment might be necessary for severe cases.
Staining After Cleaning: Usually caused by wicking, where buried dirt rises to the surface. Repeat cleaning process with less moisture.
Sticky Residue: Results from using wrong products or not rinsing properly. Clean again with appropriate product and ensure complete removal.
Professional vs. DIY: When to Call Experts
DIY deep cleaning works well for regular maintenance and minor issues. Consider professional help for:
- Severe water damage or flooding
- Biohazard cleanup situations
- Valuable vintage or exotic car interiors
- Time constraints or physical limitations
Professional services have specialized equipment like truck-mounted extractors and ozone generators that aren’t practical for home use.
Cost Analysis and Value
| Service Type | DIY Cost | Professional Cost | Time Investment |
|---|---|---|---|
| Basic Deep Clean | $50-80 | $150-200 | 4-6 hours |
| Stain Removal | $20-40 | $75-125 | 2-3 hours |
| Odor Elimination | $30-60 | $100-175 | 3-4 hours |
| Full Restoration | $100-150 | $300-500 | 8-12 hours |
DIY cleaning saves money while giving you complete control over products and techniques used. The main investment is time and learning proper methods.
Seasonal Considerations
Winter Preparation: Focus on salt stain removal and moisture protection. Road salt damages leather and metal components.
Summer Maintenance: UV protection becomes critical. Heat accelerates material degradation and chemical reactions.
Spring Cleaning: Address winter damage and prepare for increased usage during warmer months.
Fall Preparation: Remove organic debris that can cause odors and stains during winter storage.
Frequently Asked Questions
How often should I deep clean my car’s interior? Most vehicles need deep cleaning every 3-6 months, depending on usage. Daily drivers in harsh climates need more frequent attention than weekend cars in garages.
Can I use steam cleaners on all interior surfaces? Steam works well for fabric and hard surfaces but can damage leather and some plastics. Always test in inconspicuous areas first and use appropriate temperature settings.
What’s the best way to remove pet hair from upholstery? Use a rubber brush or squeegee to loosen hair, followed by thorough vacuuming. Fabric softener spray can help release stubborn hair from fabric fibers.
Is it safe to use household products like dish soap for car cleaning? Dish soap can work for some applications but may leave residue or damage certain materials. Automotive-specific products are formulated for interior materials and provide better results.
Conclusion
Deep cleaning your car’s interior requires patience, proper products, and systematic approach. The techniques I’ve shared come from years of professional experience and consistently deliver excellent results. Start with proper preparation, work methodically through each step, and don’t rush the process.
Remember that deep cleaning is an investment in your vehicle’s value and your daily comfort. A clean interior makes every drive more enjoyable while protecting your investment for years to come. With practice, you’ll develop efficiency and achieve professional-quality results at home.
The key to success lies in using the right products for each material type, taking time for proper drying, and maintaining your results with regular care. Your car’s interior will look, smell, and feel like new when you follow these proven methods consistently.